")
How To Repack Your Trailers Wheel Bearings
Manually repacking wheel bearings on a trailer is a time consuming process, but relatively simple if you don’t mind getting a little grease under your nails. Lubricating the bearings helps to prolong their lifespan and prevents them from overheating while in use. Over time moisture can build up in the grease along with debris collected while on the road. Contaminated grease has a tendency to overheat easier. Debris can physically damage the bearings if not removed. That’s why it’s important to always ensure your wheel bearings are exposed to fresh grease inside the hub.
When repacking bearings you will need an assortment of tools/supplies including: hammer, rubber mallet, floor jack, flat screw driver, impact gun/breaker bar, socket, paper towel/rags, needle nose pilers, vice, prybar, Channellock’s, high temp wheel bearing grease, new hub seals, solvent, brush, air compressor, brake cleaner and a flat piece of wood or metal to pound in the grease seal with.
How To Remove The Trailer Hub
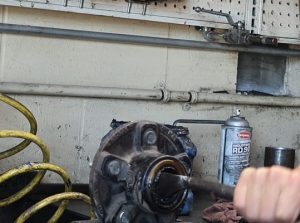
The first step to greasing your wheel bearings is jacking up the trailer. Then removing the wheel and tire assembly using an impact gun or breaker bar. Simply loosen and remove all the lug nuts from the hub assembly and slide the tire assembly off the hub. Now that the trailer hub is fully exposed it can be removed. Start by removing the dust cap by wedging a flat screw between the lip of the cap and the face of the hub. This can be done using a hammer to hit the screw driver. Once a gap has formed between the two components take a rubber mallet and gently tap the cap and spin the hub until the dust cap comes off.
The next step is to remove and loosen the components that hold the hub onto the spindle of the axle. To start, take a rag and wipe away all the grease that is covering the nut and washer. Once partially cleaned you will see either a cotter pin or a tang washer holding the castle nut in place. If its a cotter pin take needle nose pliers, bend it straight, and tap it out of the hole that’s in the spindle. If its a tang washer bend the arms flat against the spindle. Once these components are out of the way use Channellock’s to break the castle nut loose, then finish unthreading by hand.
How To Disassemble The Hub
Once the hub is loose on the spindle, gently slide it off using your thumbs to keep the washer and outer bearing from falling out. After removing the hub, wipe the old grease off the spindle using a rag. Then take your hub and remove the outer bearing and washer for later. Take the hub and tighten it down in a vice so that the back of the hub is facing you. Take a prybar with a 90 on the end and slide it between the seal and inner bearing. Work your way around the hub prying the seal out of the hub. Do not pry against the inner bearing as this may cause damage. As the seal comes out of the hub ensure the inner bearing does not fall out. Dispose of the old seal and begin wiping down both the inner and outer wheel bearing with a rag.
How To Clean Wheel Bearings
Pour some solvent into an open container and set your partially cleaned wheel bearing inside, fully submerging them. As the bearings soak in the solvent begin removing the grease from the inside of the hub. Start off by using your finger to get a majority of the grease out. Then wad up some paper towel, push it down into the hub, and spin it around. Once all the grease has been removed, spray the inside of the hub with brake clean and blow it out using an air compressor. Do not spin the bearings with compressed air!
After letting your bearings sit in the solvent for a while begin lightly brushing them with a soft bristled brush. Work the bristles inside the rollers of the bearings dislodging any grease that wasn’t removed by the solvent. After scrubbing the bearings take them out of the solvent, spray them with break clean, and blow them off with an air compressor. Be sure to inspect the wheel bearings once they are clean for any damages. Looks for things like damaged rollers, bent out rings, and excessive corrosion. If you find any damage signifying their replacement, you can find our wheel bearing replacement kits here!
How To Grease Wheel Bearings
Now that all the components of your hub assembly are clean it’s time to apply the fresh grease. Begin with you hub facing upside down. Take a wad of high temp bearing grease and apply it to the inner race within the hub using your finger. Spread it around evenly on the race then repeat the process as you work your way up the hub. Once the bottom half of the hub is greased begin greasing the wheel bearings.
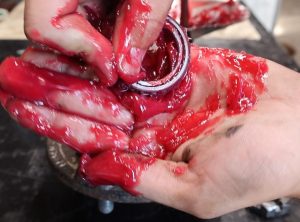
To grease wheel bearings take a small wad of grease and place it in the pal of your hand. Then take the bearing in your other hand and press the grease down into your palm with the bottom of the bearing. This technique will work the grease up into the rollers of the bearings ensuring they are thoroughly greased. Continue pressing the grease through in the same spot on the bearing until you see it emerge from the top of the bearing. Continue doing so until grease has fully emerged from the top of the bearing all the way around.
How To Insert A New Grease Seal
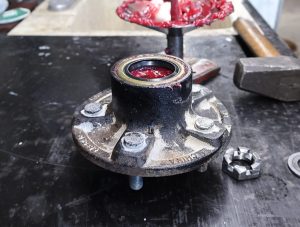
Now that the bottom half of the hub and the inner bearing are freshly greased insert the bearing back into the hub. Once fitted in the hub take your new grease seal and pound it into place. This can be done using either a piece of wood or flat metal and a hammer. Pound the seal down into the hub until it is flush with the cone of the hub.
After inserting the wheel bearing seal flip the hub over and repeat the same process of greasing the outer half of the hub and the outer bearing. Once complete take some access grease and evenly apply it to the axle’s spindle. Now take the hub and slide it back onto the spindle making sure that the seal presses over the lip on the spindle. Take the washer and slide it onto the spindle pressing it up against the outer bearing. Begin threading the castle nut back on and tighten it down with Channellock’s.
Re-Installing the Hub
When tightening down the castle nut be sure not to over tighten it or leave it to loose. To do this tighten it down using the Channellock’s until it is snug then as you spin the hub quickly loosen and tighten the castle nut to snug it up to the bearing. You should not have to torque the nut but rather snug it up. Once you feel it is tightened correctly shake the hub back and forth making sure there is no play in it. If the hub wiggles the castle nut is to loose. Now that the nut is tight either slide your cotter pin through the hole in the spindle or bend the arms up on the tang washer.
Finally, the last steps are to pound the dust cap back on the hub with the rubber mallet. Then using the impact gun or socket wrench, bolting the wheel and tire assembly back on the hub.
How Often Should You Grease Bearings
Blueswift Axles recommends greasing your trailer’s wheel bearings at least once a year or every 12,000 miles. It’s important that wheel bearing grease remains in good condition and should be inspected and topped off often. Without fresh high temp grease your hub and bearings can critically malfunction.
What Happens If You Don’t Grease Bearings
If you don’t repack bearings at least once a year or every 12,000 miles the bearings can become corroded. This can lead to the bearings seizing up, which can cause the wheel to come off the axle. In the worst cases, this can cause an accident. Furthermore, an incident like this can lead to further damage being done to your trailer’s hub and axle’s spindle. Replacing these components can add up very fast, so it is always important to have a greasing schedule.
If you have found yourself in a situation where your in need of a new axle or parts, contact us today at (515) 608-8040 and we’ll get you the parts you need to get back on the road in no time! If your looking to upgrade you can shop our trailer axles here.